
You are here: Home
|
|
|
You are here: Home |
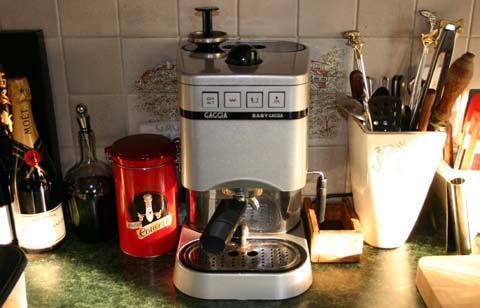
Espresso with L-platesUpdate March 2012: The pump I transferred from my old machine to the one I got on Ebay has now started working only intermittently. However, Google found me a web-page that sheds a lot of light on this troublesome component, a source for a new but slightly different pump and then an Ebay source for a direct replacement at less than half the price! And then the pressure-relief valve needed attention! See end of page... Update March 2011: See bottom of page for a major salvage operation when my ageing Gaggia Baby finally died, thanks to a lucky strike on Ebay and some more scary DiY. Update June 2010: More on preserving the filterholder gasket. Update July 2009: Problems with my Gaggia’s filterholder gasket and my dangerous DiY solution. Update April 2008: I bought a bag of espresso ground coffee from Costa this week, after quite a long break. I don’t know why, but it didn’t taste anywhere near as good as what they serve in their bars - and for me confirms that Lavazza Red is the way to go (and a lot cheaper, especially in double packs). In The Fine Art of Feasting, the manifesto of our catering business, Partners in Your Kitchen, we said that we hoped eventually to be able to take a serious espresso coffee machine to our clients’ homes for dinner parties. Sadly the business ceased trading long before the espresso machine materialised at Christmas 2005, when Patricia bought me a Baby Gaggia (pronounced ’Gajuh’, please!), which I chose because this is the name I remember on the huge, snorting machines in the coffee bars of the fifties and sixties (yes, I really do go back that far). Since then it has had pride-of-place in our kitchen. Just over a year on, with the machine used literally every morning when we’re at home, I’m still refining my coffee-making technique. Making espresso and properly frothed milk are serious skills: my stepson Alistair worked for Pret-à-Manger for a while, and it took two weeks to become a fully-trained barista. He gave me some valuable tips when I first got The Baby.
This is where it lives with its essential accessories. On top is the single-shot coffee-filter, rarely used but a handy holder for the tamper, which is used to pack coffee evenly into the filter. To the left is the nice old French coffee tin in which the currently-open bag of ground coffee and the standard measure are stored. To the right is the little olive-wood box - a bit too little, really - into which the cake of used grounds is emptied from the filter with a sharp bang (or two, or three, depending on how long it has been left). Choosing a coffeeThe machine came with a tin of Gaggia’s own coffee. This was good, but it is not too easy to find, so I tried some others from supermarkets. Illy, also in tins, is very expensive, and didn’t seem to me to be better than any of the Lavazza coffees (except Crema e Gusto, which attempts to make credible espresso in non-espresso coffee-makers - it may succeed there, but it made pretty a vile brew in my machine). I tried a Sainsbury’s own-brand espresso, but it was so bad that I threw it in the composter. I also tried an imported Italian espresso called San Marco, bought from a Leclerc hypermarket in France. That gave the Sainsbury’s one a run for its money in terms of direness and went the same way. Then I discovered that some of the rapidly-spreading chain coffee houses sold their own blends. Caffe Nero was surprisingly disappointing, but Costa coffee ticked all the right boxes for me - rich and dark but quite mellow, and ground perfectly (that is very fine) for my machine. It also has the great advantage that Costa cafés are springing up like mushrooms in UK motorway service stations, so that there is finally somewhere civilised for the weary traveller to stop for a brew and a panino. We found the first one at Maidstone Services on the M20, a perfect comfort stop on the way to or from France. Then they began appearing on the M1, and there is now one at Tibshelf Services, close enough to home for us to pop out for a latte and the purchase of a couple of bags. In July 2007I decided that the last batch of four bags of Costa coffee I had bought was disappointing, so I bought a packet of Lavazza red and found it at least as good - and both cheaper and a lot easier to obtain at Sainsbury’s, the Co-op in our village and even the One Stop Shop (6am to 11pm, seven days a week) two minutes walk from home. I’m revising this in August 2009, and we’re still faithful Lavazza red users. Pause for joke against myselfTalking of latte, here’s a dire warning: don’t ever ask for a ’latte’ in an Italian bar or café. We were in Pisa, on the way home from a week in Tuscany a few years ago, and decided to have a coffee between ’doing’ the Leaning Tower and hitting the autostrada. Nonchalantly, I guided Patricia, her son Alistair and his partner Julie to a café terrace and, when the waiter arrived, asked for ’Quattro latte, per favore’. He looked a little perplexed and asked ’Freddo, signore?’ (cold, sir?). ’No. Caldo, per favore,’ I replied. Even more perplexed, he headed for the bar, returning a few minutes later with exactly what I had ordered: four hot milks. In Italy, ’latte’ means milk. If you want coffee with milk you ask for it: caffe latte. You live and learn. As I recall, we drank our hot milk and hightailed it back to France, where our linguistic capabilities were a bit more highly developed - but the coffee found in most bars is disappointing. Making coffeeSome espresso machines have cup-warmers on top, but The Baby doesn’t. I can’t imagine they get hot enough, anyway. The answer for me is to run some hot water into each cup and leave it there while I fill the filter with coffee. There are two ways to do this. The first is to follow the machine’s instructions for ’making hot water’ (for tea, perhaps - but the kettle is much easier and cheaper to replace when it wears out). You put a cup under the milk frother - the spout you can see sticking out on the right. Then you turn on the steam valve (the black knob on top), press the milk-frothing button and then the pump button. After a brief blast of steam, the milk frother delivers hot water into the cup. Complicated. The second is easier: just swing the handle to the left and remove the filter holder, put the cup under the shower plate (the bit that distributes the water evenly over the coffee) and press the pump button. When you have enough water, press the pump button again to stop the flow. This has three advantages: it washes any stale coffee grounds off the shower plate (a metal disc perforated with hundred of minute holes); It delivers the hot water more quickly and with less button-pushing; and, finally, it flushes out any stale water lurking in the boiler and the pump. I habitually top up the machine with half a litre of cold water before use, and each two-cup batch more-or-less uses this up. I leave the cups, with their hot water, to stand while I measure the coffee into the filter. I use the two-shot filter and make two smallish cups for Patricia and myself. If I am alone, I use a big mug and have both shots myself! Then I pack two measures into the filter by pressing my fingers against the outside of the bag, scraping each flat with my finger, and press it down firmly with the tamper. I then offer up the filter holder to brewing head and swing the handle to the right to lock it. This needs to be done firmly to seal everything. The quality of the coffee depends ultimately on getting the quantity of grounds exactly right so that the water is pumped through quite slowly to fom a good crema - only trial and error can get this just right - and the quantity seems to vary between coffees: maybe it’s to do with just how finely it’s ground. I tip the cleaner water in the second cup into the first, swirl that round and pour away. Any grounds sticking to the cup are squeegeed out with a finger. I then put the cups under the two spouts on the folter holder and, if the hot-water light is out, press the pump button (if not, I wait until it goes out, indicating that the water is at the correct temperature). Two thin streams of very black coffee run into the cups. Then the colour becomes paler and the famous crema starts to build up - that’s the dense golden foam you get with good coffee properly made in a real espresso machine (and which I didn’t with the crummy Krups one I bought in about 1990, which relied on steam pressure to push the water through the grounds - The Baby has a pump that delivers a pressure of 15 bar). When both cups have a good golden crema, I switch off the pump and remove Patricia’s cup, because she likes more milk than I do. I move my cup under both nozzles and let the coffee run until the cup is about half full. I can do this because The Baby has ’free flow’, which means I control how much water is passed through the coffee. Some machines only deliver a standard shot, which gives you no control at all. Avoid! Now I press the steam button. The steam light comes on, and while I’m waiting for it to go out, I put the milk (we now use sem-skimmed) in the frothing jug and put sugar in any cup whose owner (like Patricia) wants it. The jug I eventually settled for is a half-litre stainless steel one with marks at the quarter- and half-litre levels. I fill it to the quarter-litre level. When the light goes out, I put the jug under the frother with the tip just below the level of the milk and turn on the steam valve. I like to swirl the milk around, and I try to keep the tip of the frother just low enough so that the steam is trapped by the liquid, which I reckon extracts the maximum heat from it as it is blown all the way to the bottom and floats back up again. It’s important to note that the frother isn’t like the ones on professional machines. It has a push-on plastic venturi that sucks in air with the steam to make frothing easier for amateurs. I used to think that I had to stop steaming when the steam light came on and wait for the boiler to heat up again, but after almost a year of experiment I discovered that I can keep going - the heating element obviously keeps up the pressure and the light actually goes off again after a bit. I keep going until the jug is just at the too-hot-to-touch point, then turn off the steam (the jugs in Costa bars have dial thermometers clipped to them for total control). At this point, if I’ve got everything right, the jug should be full to the brim. If I have a good head of froth (it varies quite unaccountably - perhaps with the age of the milk), I can’t get the jug out from under the frother without spilling some, so I always put a clean J-cloth underneath to catch the drips. While I’m at it, I wipe the frother, blow some steam through it, pull off the venturi bit, tap it on the J-cloth and blow through it with my mouth (I know, not very hygienic!), then wipe the rest of the fitting before replacing the venturi. Using a teaspoon to hold back the froth, I tip the liquid milk slowly into the cups. I try to pour a steady, thin stream through the centre of the crema. I stir any that have sugar gently, so as not to spoil the lovely effect of the milk interacting with the crema (I’ve developed a technique that keeps the shaft of the spoon fairly still where it passes through the surface of the coffee). More recently I’ve discovered that, at this point, it pays to bang the jug on a folder J-cloth a few times: this compacts the froth and also allows it to pour smoothly so I don’t need to scrape it out with a spoon - you live and learn! If you’ve got everything right, there will be a lovely brown ’halo’ round a core of snow-white froth. When the coffees are made, I move the handle of the brewing head to the left and then gently to the right. If I leave it locked on tight, it has a nasty habit of leaving the filter - or just the cake of coffee grounds - behind, firmly attached to the shower plate, when the coffee dries as it cools. It’s a bugger to work loose when this happens. MaintenanceI try to remember to empty and wash the drip tray regularly - it’s under a perforated chrome plate on The Baby. What gets into it becomes pretty horrible after a few days, so I don’t want it overflowing. I also wash the folter holder and filter(s) when we’ve had the last coffees of the day - in the dishwasher if the timing is right.. The holes in the filters are very fine and can become clogged, in which case I scrub with a hard brush under running water. I hold the filter up to the light when it’s dry and check that at least most of the holes are clear. It’s important to empty and wash the water reservoir regularly. There’s no point in brewing excellent coffee with stagnant water. Finally, I wipe the shower plate with a clean cloth after I’ve made the coffee. And I take it off and clean it once a week. I thought I was going to have to de-scale The Baby early on, but when I took the shower plate off (which in my case needs a stubby Posidriv screwdriver) I found a heavy deposit of coffee on the upper surface: it had obviously found its way backwards through the holes. The bit that can get badly clagged up is the frothing head. Unlike the ones on professional machines, which just deliver high-pressure steam, this has that complicated venturi that sucks in air. However careful I am, milk gets into the air intake, and because the steam is so hot some stays there and bakes on. It therefore pays to dismantle the assembly quite frequently. If I don’t, the hardened milk is hell to get off. (For the technically minded, milk contains a protein called casein. It used to be used for a wood glue called Casco, before it was replaced by an infintely more polluting urea-formaldehyde resin. My Dad, who was an industrial chemist, also assured me that the ’bone’ handles on our dinner knives were made of casein. So it’s not surprising that baked on milk gets very hard.) Both the filters and the shower plate have incredibly tiny holes to prevent the very finely-ground coffee getting through. If more than a few of these remain clogged when I’ve done my best (after a night in the dishwasher), I find boiling them in a small pan of water for a while gets them clear - or a night in the dishwasher if the timing is right. Finally, Gaggia recommend regular de-scaling with their own specialist product (well, they would, wouldn’t they?). My machine suddenly ground to a complete halt about eighteen months after purchase, and de-scaling (with a generic commercial de-scaler recommended for coffee machines among other things) sorted this out. I’m amazed the machine lasted as long as it did, as our local water is very hard. I now strip, clean and de-scale the whole machine every few weeks. First failureAfter about 20 months the plastic handle on the filter holder started to crack up, and eventually it came apart in my hand. I scoured the web for a replacement handle, but ended up paying about £30 (including postage) for a complete assembly. In fact, if I could have bought the handle I don’t think I could have found a box spanner compact enough to unscrew the old one and fit the new one. How hard would it have been be to use a slot- or Posidriv-headed bolt instead of a hexagonal one? No fools, these Italians. It was after fitting the new filter holder that I noticed that the handle wasn’t swinging round as far as it used to when locking the head in place. As a result, water was escaping from above the coffee in the filter. Then, when I did the next major service, I realise that there was caked, burnt-on coffee on the cylindrical housing of the shower plate. It was the devil’s own job to clean it, but suddently everything fitted together right - more-or-less. Enjoy...I hope this page will help you to make the best possible coffee, whichever machine you’re using. I’m very happy with The Baby, but if I was replacing it I’d go for a machine with separate boilers for the coffee-water and the steam. That would eliminate the wait for the steam to build up after brewing the coffee. Kitchen Aid make one like this (it’s the red retro one you can see on the worktop on BBC1 TV’s Saturday Kitchen. I’m not sure I’d trust any but an Italian company to make an espresso machine, though! Update 30 July 2009For a long time I thought it was the quantity of coffee in the filter that governed how far the filter holder lever went round and whether water was able to leak past it. When, during a routine clean, I looked up inside the bit it locks into, I saw a very dodgy-looking shiny, flat, black surface. A bit of research revealed this to be the filter holder gasket - or what was left of it. Gaggia don’t tell you much about this gasket in the user’s manual, other than that it should be kept clean (no precise instructions for this). What they certainly don’t reveal is that with time and heat the synthetic rubber seal (neoprene or silicone - dunno!) hardens and needs replacing - about every year, I was advised this week! I think Gaggia assume that you will pay their exorbitant service and transport charges to keep your machine regularly serviced (they don’t appear to have a chain of local service agents). Mine has been in use for over three years with only limited attention to this bit, and as described above it was showing its age. I was wandering around various espresso-head forums this week and found out that I should have replaced the gasket about every year! I found http://www.happydonkey.co.uk/ and the gasket details at http://www.happydonkey.co.uk/hd6005.html. I ordered two - fortunately, because in my first attempt to replace the gasket I ended up ruining it. The diagram in the manual shows the shower disc holder, a casting to which the disc is screwed, as a separate piece which is held on by two screws and should be removable by the user. Mine emphatically wasn’t. It took me about two hours to hack out the rock-hard gasket in little bits using a chisel and various screwdrivers, even aided by a light hammer! Then, following instructions emailed by Happy Donkey Ltd, I tried to get the new gasket in over the shower disc holder. Eventually it was in, but was visibly twisted, with the result that the filter holder could not be locked in place. So out came the chisel and screwdrivers (no hammer needed this time) and, eventually, the gasket. At this point I tried to find a local professional who could service the machine. No success. It seems Gaggia have maintained a monopoly on this. Then I tried to find a service manual on the Web. No success there, either. You’d think someone would have scanned it and published it - but maybe Gaggia don’t even print one. Finally, reassured by the fact that loads of decent-looking secondhand Gaggia machines are going for very reasonable prices on Ebay (I suspect a lot of people embark on the espresso trail with the same enthusiasm as I did, but when they realise how complicated it all is most fall by the wayside and decide to cut their losses), I resorted to DiY. I have a pretty good track-record of servicing my own domestic appliances, but this was new territory. However, I eventually managed to dismantle the machine, and was very impressed with the engineering: the inner workings are all heavy brass and ’monkey metal’ (zinc alloy) castings, even if they are wrapped up in light pressed steel and dodgy plastic. But this didn’t help me at all with getting the shower disc holder off. I’d hoped to be able to knock it off from above, but there was no access. Then I had a brainwave: if the threaded hole into which the shower disc screws went all the way through the casting... Hastily, I went to the garage and grabbed a box of assorted bolts. I found one with the same thread as the shower disc one, but quite a bit longer. I screwed this in as far as it would easily go, and then tentatively applied a screwdriver. After an agonising couple of turns, the holder cracked free of its three-year accumulation of charred coffee dust and dehydrated coffee. Please note the word ’tentatively’. Peter Barwich, who posted a comment on the 28 May 2010, has since pointed out that there is a risk, depending on what type of valve is fitted to the machine: ’On Gaggia machines without a 3 way solenoid valve the group head is fitted with a group head valve, or group valve. This basically stops the boiler draining by gravity through the group head. This valve is screwed into the group head above the shower screen retaining plate, and it is screwed dead bang in the centre! This means that the extraction screw will hit it if you use your method, and possibly cause damage.’ My machine is a Baby Gaggia, but I don’t know if all Babies have the same setup as mine. Be warned! A lot of work with Scotchbrite and steel wool eventually had the thing more-or-less cleaned up, and my second gasket went into place quite easily. Amazingly, I managed to put the machine back together with only a few hiccups, and was deeply relieved when my first trial cup of coffee came out fine. The filter holder locked in a millimetre or two higher than before, thanks to the soft gasket, and there were no leaks. At this point, though, I decided that the warning ’No user-serviceable parts inside’ is definitely true for espresso makers. Unless you are a qualified electrical appliance engineer, I strongly urge you not to dismantle a Gaggia! But from now on the holder will be removed as part of the regular weekly service, so that I can really keep the gasket clean and avoid the build-up of highly adhesive gunk, as well as seeing when the gasket is coming to the end of its life! 3 August - Monday, Monday...On Mondays Patricia goes a-grannying, to look after her wonderful younger (2-year-old) grandson. And that’s the day I do all my routine stuff: change the bed, wash and dry the linen, carry out any administrative tasks needed on Sites4Professional (which on a good day means issuing invoices!)...and clean the Gaggia. So today was the first chance to try removing the shower disc holder easily. Or not. I still needed to use the longer bolt to free it. On close examination it still had quite a lot of black, tarry, burnt-on coffee residue on it. So I soaked it in Cillit Bang Lime & Grime remover and then attacked it with a small knife followed by a Scotchbrite scourer. Eventually it slipped into place easily and fell out again as soon as I took my fingers away. We’ll see how this goes next Monday... The good news is that an even nicer, cleaner-tasting mug of coffee followed. 10 AugustToday the shower disc holder dropped free as soon as the screws were removed, so from now on it will be very easy to keep it clean and also to clean the seal thoroughly. 7 June 2010After less than a year, I began to get leaks while brewing coffee again. During the now-established weekly sservice, I had a close look at the seal I’d replaced in July 2009. It had become quite hard and there was a definite impression where the rim of the filter had left its mark. I ordered some more seals from Happy Donkey and subsequently had a much easier time doing the replacement - the old one was dug out quite easily. This page has generated quite a lot of correspondence. A couple of people have been saved expensive servicing bills by my tip to use a bolt to lift off the shower-plate holder. One pointed me to the process of back flushing as a way of clearing out the fine coffee particles that work their way even further back into the guts of the machine. It involves blocking the filter so that the high-pressure water is pumped back through something called athree-way valve. I googled this, and found some pretty heated arguments on various espresso-head forums, so I have resisted the temptation to try it. However, I want to pass on... One more important tipIn my guide to actually using the machine (above), I wrote the following: When the coffees are made, I move the handle of the brewing head to the left and then gently to the right. If I leave it locked on tight, it has a nasty habit of leaving the filter - or just the cake of coffee grounds - behind, firmly attached to the shower plate, when the coffee dries as it cools. It’s a bugger to work loose when this happens. I would now add something that I hope will increase the life of the troublesome seal. I actually knock out the grounds at the end of the process, and unless I intend to make more coffee soon I switch off the machine and leave the filter-holder unmounted. If I do expect to be making seconds, I leave it loosely mounted - moving the handle to the right until it stops and then back a bit. This keeps it hot but takes the pressure off the seal. And I have stopped leaving the machine on for extended periods in the hope that this will slow down the hardening of the seal. Death and (I hope) resurrection4 March 2011 Looking back, I see that I’ve never owned up to my biggest disaster with the Baby. During one of my earlier Monday services I got some water into the electrics and when I switched the machine back on a circuit-breaker tripped on our consumer unit. On reflection, I should simply have left the machine somewhere warm to dry out, but in a panic I decided to put it in a very low oven - around 60°C - instead. The impressive-looking ’range’ cooker we inherited when we bought the house is actually not very effective, and it seems that one of its previously undiagnosed faults is a very inaccurate oven thermostat. When I took the machine out, the casing had distorted quite badly. The most obvious symptom was that the cover of the filling funnel would no longer fit its recess. It was also now much more difficult to push the water reservoir back into place. However, when I switched on the machine it worked fine, so I relaxed and went on enjoying my coffee. Much later, the pump started sucking air, and I discovered that the silicone tube that picks the water up from the reservoir had split, presumably due to the extra stress it suffered when reinstalling the reservoir after cleaning. To my great relief, a tight winding with insulating tape solved this problem and I set about finding a replacement. I tried http://www.happydonkey.co.uk/, but they couldn’t help and suggested an aquarium supplier. Our local one had nothing, so I did a lot of googling and discovered that there are hundred on different sizes of tubing. Then I went to the official spare-parts supplier, http://www.dutchwest.co.uk/, part of Philips: I filled in an enquiry form, and having still received no response after three weeks decided to carry on with the insulating tape. Then the steam control knob on top surrendered to the heat conducted up the spindle. I managed with a small pair of pliers for a while, then tried an ill-fitting control knob off a camping stove packed with foil, and eventually reverted to the pliers. Finally, last week, I decided the machine was long overdue for de-scaling. This entailed a lot of switching on and off and, just as I’d finished, the main on-off switch refused to latch. I took the top casing off the machine but couldn’t see why, so I guess the inner workings of the switch had failed. As mentioned earlier, there are quite a few secondhand Gaggias on Ebay, and I was incredibly lucky: one Baby of the same vintage as mine described as not working properly but probably repairable, with a starting bid of just 99p. It sounded as if the problem might just be the silicone tube leaking, so I decided to take a punt. My lethal bidding technique (slap in my maximum just 15 seconds before the auction ends) landed this for £46 including £12 postage. My limit have been £50 including the postage, so I was lucky to get the machine - and someone else must have been seriously dischuffed! Confusingly, the machine arrived in the box from a much newer version of the Baby, but it turned out to be the same version as mine. The seller had said that the pump sometimes worked and sometimes didn’t, and when I tested the machine nothing happened initially. Then, after switching it on and off a number of times, with longish pauses in between, the pump suddenly started. I’d already cleaned off many limescale marks all over the reservoir and the casing (Cillit Bang Lime & Grime - excellent!). I had then taken off the shower disc and shower disc holder, and found the latter caked with furry-looking but very hard limescale that had even found its way halfway along the threads of the mounting bolts! Being a natural optimist, I decided that the pump problem might be nothing more than limescale jamming it, and after 24 hours of descaling with two batches of the chemical it worked every time. Then it failed to start. Obviously the problem was a bit more serious. I took the steam/hot-water knob and the top casing off and tried the switches. I’d noticed that, only when the pump didn’t start, there was a very loud click when I pressed the switch. I tried to locate the source of this, but there are so many components inside - not to mention dozens of coloured wires - that I couldn’t pinpoint the sound. However, since it was the pump that wasn’t working I decided to gamble that it was the source of the problem. Being cautious, I tried removing the pump on my old machine first. I found that the plastic moulding holding the electrical windings was quite simple to disconnect and dismount, though I couldn’t immediately see any easy way to dismount the plastic moulding that held the moving parts. So I decided to swap just the two outer mouldings. This only took a few minutes, and to my delight the ’new’ machine worked. To celebrate, despite having had my morning ration of caffeine, I made myself a two-shot latte. So now I have what appears to be a fully functional Baby and a whole box full of spare parts. Fingers crossed... 11 March 2011 That was yesterday. I’m leaving the last line in, just for dramatic impact, because... The next time I pressed the pump button, it didn’t pump! I’d had enough for one day, but this morning I decided to see if I could swap the rest of the pump - well, the actual pump bit of the pump. This is a modest plastic (nylon, I think) moulding, mostly a plain cylinder, with what looks like a spring inside. At the end there’s a hefty flange onto which the magnetic winding unit I replaced yesterday screws. The whole thing is mounted in two rubber mounts - a flat bit with a hole in through which the pump cylinder pushes with a flange at the bottom that pushes through one of two stirrup-like bits pressed up from the steel baseplate on which pretty well everything mounts. As before, I went to my old Baby first rather than blundering around in the ’new’ one. I spent quite a lot of time trying to force the rubber flanges out of the stirrups before I spotted that each flange has two holes in it, which I was able to see when the rubber stretched as I tried to rip the mount out of its stirrup. After quite a lot more wrestling, I managed to bully the pump moulding out of the mounts. I could then see two little black plastic prongs sticking up under each stirrup: these obviously mated with the holes in the flanges to stop them coming adrift as the pump vibrates - quite effective, considering the amount of my brute force and ignorance the mounts had resisted! Having spotted this, I approached the ’new’ machine a bit more gently, unscrewing the steel baseplate from the back piece of the plastic casing. Sure enough, there were the four prongs. The mounts then slid easily out of their stirrups, despite lots of limescale, and it only took a quarter of an hour to mount the pump assembly - all from my old machine - and test it. It worked. While the casing was dismantled, I gave it a good clean. Then I reassembled the machine, fitted the spare filterholder gasket I’d had in reserve (long overdue!), pinched a rubber foot off the old one so that the ’new’ one had four again, fed it some water and tested it. Coffee brewing, steam and hot-water functions were all as they should be. However, I’m going to avoid any optimistic predictions as the last one proved very premature. Suffice to say: we shall see... 14 March 2011 Just had the usual two lots of coffee and everything seems to be working fine. 8 March 2012 And it went on working fine for almost a year. Then pumping became intermittent, as with the machine I found on Ebay. I fished the spare (and malfunctioning) pump out of my box of spares today and worked out how to dismantle it. When things got difficult I did a Google search and, through a 6-year-old forum posting, found a French site with some brilliant diagrams of the pump. I found one possible explanation for the problem with the Ebay pump: a mysterious C-shaped ring that was rattling around loose in one of the pump’s two springs. I spent a lot of time trying to find a home for it, and it was only when I dismantled the other pump that I realised that it was the last turn on the spring that had snapped off. This didn’t explain why my pump was giving trouble, though, so in the end I put the unbroken spring in the Ebay pump, reassembled the machine for the Nth time and tested it. The pump worked. Whether it will continue to do so remains to be seen... However, I also found a link to Happy Donkey, who now seem to be selling new pumps for £25.99. The one they’re offering has a brass pump barrel rather than a nylon one, which ought to be more reliable. We’ll see, if the need arises... 22 March 2012 It did, quite quickly. I don’t know if it was me being careless, or what, but last week I ended up with two non-functioning pumps. It looked as though I’d be spending over twenty-five quid with Happy Donkey until one of my Google searches turned up an Ebay dealer auctioning several pumps that looked identical to mine (with the nylon barrel) with a starting bid of only £9.99. I emailed the dealer, who replied saying ’No these are not off Gaggia machines’, but at just over a tenner I decided to take a punt. I was the only bidder for the first pump, landing a brand-new one for just £13.98 including first-class postage. It arrived this morning - an exact match for my two defunct ones. I’ve just installed it - a ten-minute job, but with my hands shaking (excitement or anxiety - dunno) it wasn’t easy to keep the screwdrivers in the screwheads! Anyway, it worked perfectly first time and I’ve just flooded my system with caffeine from a perfect double espresso. Phew! The details on the pump’s label are as follows: ULKA S.p.a - ITALY (on a green strip). Model E Type EP5. 230V 50Hz. 2/1 min. CI.F 48 W. CS M6294. The last two bits (61418 25/5/05 in my case) vary from pump to pump. One thing is for sure: if I ever have to dismantle this pump I’ll pay a lot more attention to exactly how the bits fit together! 28 March 2012 Six days on and the Gaggia is working perfectly. 2 April 2012 Yesterday something didn’t seem quite right. Water was running out of the pressure relief valve outlet back into the reservoir and only a trickle of coffee was emerging at the business end. We managed to get an acceptable cup each, but this morning the problem had obviously got worse. I decided (rightly, as it turned out) that I couldn’t have reassembled the valve properly when fitting the new pump. I did some unsuccessful blind groping around in the outlet with various screwdrivers, but in the end I had to dismount the whole pump. At this point I found (as I should have remembered) that the valve is screwed together with a hex (Allen) key - the same one used to remove and re-fit the show-plate carrier! However, the moving part of the valve seemed to have come apart - the little rubber insert was halfway out of its recess. I got it back in - eventually, because it resisted my initial efforts - screwed it down tight and then loosened it a couple of turns. Once everything was back together we got an excellent coffee with a dense, dark crema, so it must have ended up tighter than before, producing a higher brewing pressure. The steam output from the frother seemed to be better, too, so three birds with one stone... 3 April 2012 Patricia found yesterday?s coffee a bit fierce. I found it stronger than usual (we make two cups using the two-shot filter and that?s normally a bit weak for me) and it occurred to me that - having established that the valve is assembled and adjusted with a hex key - I could adjust it without any dismantling other than the removal of the reservoir. I have just done this very easily, giving the key a quarter-turn. We?ll see... |
Personal site for Paul Marsden: frustrated writer; experimental cook and all-round foodie; amateur wine-importer; former copywriter and press-officer; former teacher, teacher-trainer, educational software developer and documenter; still a professional web-developer but mostly retired. This site was transferred in June 2005 to the Sites4Doctors Site Management System, and has been developed and maintained there ever since. 
|
|